Having recently been reading back numbers of the "Mercury" to glean information which might help In the construction. of my Penrhyn loco "Linda", I came across an article by expert Don Boreham (who?- ed) on his Fijian loco. In it, he mentions the fitting of cranks on axles on outside frame locos, and stated that he would one day make a jig. Well Don, I have made one, and it is yours for the borrowing. For others, who may be contemplating loco building, read on.
As I have said, I am building a Penrhyn "Linda" and having turned up my own wheels and axles, and getting them running nicely in the axleboxes I turned my attention to the fitting of the cranks. Now, as all who have ever tried to fit cranks onto axles will appreciate, the fitting of three of the cranks - two on one axle and one on the other is easy. It does not even matter if the lead is not exactly 90, no one will ever notice, and on an electrically driven model it is not a crucial matter. It is when you come to fit the fourth crank (on a four coupled loco that is), that the problems start, for if it is not fitted with exactly the same lead as the first axle, then when it comes to fitting the coupling rods, at some point in the cycle, the whole lot will seize. This Is what happened with my loco. Now, on previous, smaller gauge, models the cranks have been threaded, and it is an easy task to adjust them to get them right, but when things are fitted with epoxy adhesive, you have to wait until it is set before you can try it out, by which time It is too late for any adjustment. You could get through the two tubes of epoxy before you get the thing right. On my loco, I thought that I could open up the holes in the coupling rods to ensure smooth running. By the time I had finished, the holes were twice as long as they were wide, so everything was sloppy and still it wasn't perfect. The answer, to make a jig for setting the cranks/crankpins, and the following is how I made mine one afternoon.
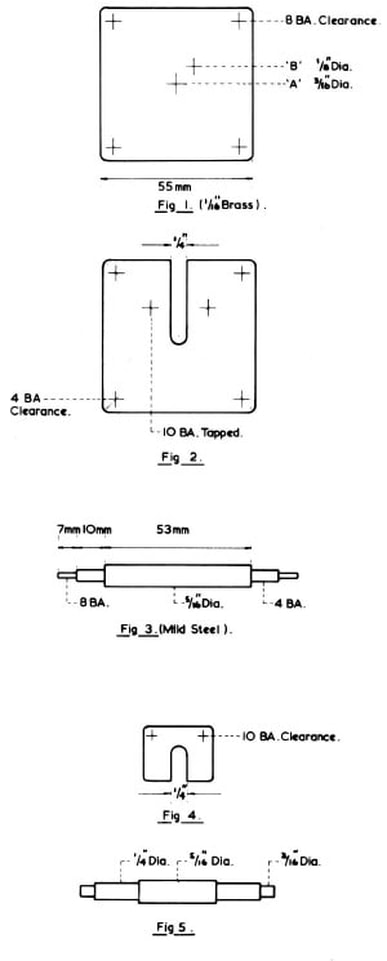
A start was made by cutting out four 55mm square pieces of 1/16th brass sheet, (brass is easier to work than steel, and there will be no possibility of any wear). When happy that all four pieces were exactly the same size, they were Araldited together and put aside to set. Note here, that they could have been sweated together before cutting/filing to size, but my largest soldering Iron doesn't give out enough heat.
At this point, having set everyone the task of filing the four plates up square, I am going to divert and explain the reasons for the design.
I have seen articles in the Model Engineer for a similar jig for large steam locos with inside frames but no mention was made of outside framed locos with separate cranks, which most narrow gauge locos of course had. Now, referring to fig.5 you will see the axles for my Penrhyn loco. The cast iron wheels sit on the 1/4" diameter up against the shoulder, which gives the correct back to back measurement. The outside cranks sit on the 3/l6' diameter up against the 1/4" shoulder. Between the crank and the wheel, and slid on before the crank is secured is the axle box which is sprung in the frames. If a jig were made with just two 55mm square plates the ends of the axles must protrude through the plates, in order to hold everything steady and In line. This necessitates making the axle longer than necessary with the reducing to Length being done when the cranks are secured in position. As it would then be impossible to hold the axle In the lathe chuck to machine to length, you would have to resort to saws and files, and as the finish by this method for me is inferior to a turned finish, I make my axles exactly to length to begin with, so that when the crank is fitted in position, all is nice and flush.
By now, the Araldite should have set, but If not, don't rush, move onto the next items. Refer to fig.3 and turn up the four rod spacers. The diameter of rod (mild steel) used is immaterial, it just so happened that I had a quantity of 5/16 diameter. The centre, unthreaded section, is long enough so that when the inner plates are fitted over the 4 BA stud, the wheels and axle boxes are between the two plates. I found that the 10mm length of a BA stud sufficient to allow the crank to fit between the inner and outer plates, with a little play both sides so that the Araldite does not spread to either plate, and gum the whole lot up. In respect of the threaded motions, I found that it was better to thread the 8 BA section first, followed by the 4 BA section. If done the other way round, the 8 BA die damages the start of the 4 BA thread.
With the four plates well and truly stuck together, work can commence on these. Mark the top plate with the two corner to corner lines. Pop mark the centre and then scribe a circle 32mm radius. Further pop mark where this circle crosses the diagonals. Along one of the diagonals, measuring from the centre, mark the throw of the crank (distance from centre of crank to centre of crankpin), and again pop mark. The four plates can now be drilled whilst glued together, and all holes will be the same. The centre hole is drilled 3/16" diameter (the axle end size), and the four Stud holes drilled for 8 BA clearance.
Do not, at this stage drill hole 'B', which is the hole for the crankpin (refer to fig.1) Separate the four plates, marking each one as you go, so that they can always be assembled in the order they were when drilled.
With plates 1 and 4 (the top and bottom of the 'pack'), bolted together with 8 BA bolts, drill hole 'B' 1/8" or whatever, to suit crankpins. These two plates are now complete.
Plates 2 and 3 are now dealt with. The already drilled 8 BA clearance holes are opened out to 4 BA clearance, and the hole in the centre opened out to 1/4" diameter, the 1/4" slot leading to it being also cut.
Moving on to fig.4, two of these keeper plates are required, and the slot is again t" wide with a 4" diameter bottom. Drill the two fixing holes 10 BA tapping size and then clamp to plate 2 so that the t" centre hole Is formed, and mark the two holes on the plate. These can then be drilled 10 BA tapping size, and the holes in the keeper plate opened out to 10 BA clearance and countersunk. Repeat with other keeper plate and plate 4.
All work is now done and the jig can be used as follows. Assemble the wheels onto the axles, and plates 2 and 3 onto the four spacers. Tighten up with 4 BA nuts. Drop the axle (with wheels on) into the slot and fix the keeper plate into position and ensure that, if necessary, the axle boxes and all washers are fitted. Araldite one crankpin on one end of the axle, and allow to set (I use the 5 minute epoxy, which saves a lot of hanging about). When set, slide one of the outer plates (1 or 4) over the 8 BA studs, and if all was done correctly, the crankpin should pass nicely through hole 'B'. When satisfied that the Araldite has really set, repeat at the other end of the axle, only this time, advance (or retard) the outer plate 90°. When all is set, you will have a completed axle with the crankpins at 90° to each other. Repeat with other axle(s), and when the loco is assembled there should be no binding with the coupling rods.
As for 'Linda', now the cranks have been refitted, I shall have to remake the coupling rods with the right size holes before building can continue, but that is another story.
Note:- The hole sizes are to suit my model, and they can be altered to suit individuals. The size of the jig described can cope with wheels up to about 45mm diameter, which should just about cover all narrow gauge prototypes. One further benefit of this jig is that if another loco is built with a different crank throw, just bolt together plates 1 and 4 and measure along another diagonal the length required and drill. By this method, four different crank throws can be obtained from one jig.
As I have said, I am building a Penrhyn "Linda" and having turned up my own wheels and axles, and getting them running nicely in the axleboxes I turned my attention to the fitting of the cranks. Now, as all who have ever tried to fit cranks onto axles will appreciate, the fitting of three of the cranks - two on one axle and one on the other is easy. It does not even matter if the lead is not exactly 90, no one will ever notice, and on an electrically driven model it is not a crucial matter. It is when you come to fit the fourth crank (on a four coupled loco that is), that the problems start, for if it is not fitted with exactly the same lead as the first axle, then when it comes to fitting the coupling rods, at some point in the cycle, the whole lot will seize. This Is what happened with my loco. Now, on previous, smaller gauge, models the cranks have been threaded, and it is an easy task to adjust them to get them right, but when things are fitted with epoxy adhesive, you have to wait until it is set before you can try it out, by which time It is too late for any adjustment. You could get through the two tubes of epoxy before you get the thing right. On my loco, I thought that I could open up the holes in the coupling rods to ensure smooth running. By the time I had finished, the holes were twice as long as they were wide, so everything was sloppy and still it wasn't perfect. The answer, to make a jig for setting the cranks/crankpins, and the following is how I made mine one afternoon.
A start was made by cutting out four 55mm square pieces of 1/16th brass sheet, (brass is easier to work than steel, and there will be no possibility of any wear). When happy that all four pieces were exactly the same size, they were Araldited together and put aside to set. Note here, that they could have been sweated together before cutting/filing to size, but my largest soldering Iron doesn't give out enough heat.
At this point, having set everyone the task of filing the four plates up square, I am going to divert and explain the reasons for the design.
I have seen articles in the Model Engineer for a similar jig for large steam locos with inside frames but no mention was made of outside framed locos with separate cranks, which most narrow gauge locos of course had. Now, referring to fig.5 you will see the axles for my Penrhyn loco. The cast iron wheels sit on the 1/4" diameter up against the shoulder, which gives the correct back to back measurement. The outside cranks sit on the 3/l6' diameter up against the 1/4" shoulder. Between the crank and the wheel, and slid on before the crank is secured is the axle box which is sprung in the frames. If a jig were made with just two 55mm square plates the ends of the axles must protrude through the plates, in order to hold everything steady and In line. This necessitates making the axle longer than necessary with the reducing to Length being done when the cranks are secured in position. As it would then be impossible to hold the axle In the lathe chuck to machine to length, you would have to resort to saws and files, and as the finish by this method for me is inferior to a turned finish, I make my axles exactly to length to begin with, so that when the crank is fitted in position, all is nice and flush.
By now, the Araldite should have set, but If not, don't rush, move onto the next items. Refer to fig.3 and turn up the four rod spacers. The diameter of rod (mild steel) used is immaterial, it just so happened that I had a quantity of 5/16 diameter. The centre, unthreaded section, is long enough so that when the inner plates are fitted over the 4 BA stud, the wheels and axle boxes are between the two plates. I found that the 10mm length of a BA stud sufficient to allow the crank to fit between the inner and outer plates, with a little play both sides so that the Araldite does not spread to either plate, and gum the whole lot up. In respect of the threaded motions, I found that it was better to thread the 8 BA section first, followed by the 4 BA section. If done the other way round, the 8 BA die damages the start of the 4 BA thread.
With the four plates well and truly stuck together, work can commence on these. Mark the top plate with the two corner to corner lines. Pop mark the centre and then scribe a circle 32mm radius. Further pop mark where this circle crosses the diagonals. Along one of the diagonals, measuring from the centre, mark the throw of the crank (distance from centre of crank to centre of crankpin), and again pop mark. The four plates can now be drilled whilst glued together, and all holes will be the same. The centre hole is drilled 3/16" diameter (the axle end size), and the four Stud holes drilled for 8 BA clearance.
Do not, at this stage drill hole 'B', which is the hole for the crankpin (refer to fig.1) Separate the four plates, marking each one as you go, so that they can always be assembled in the order they were when drilled.
With plates 1 and 4 (the top and bottom of the 'pack'), bolted together with 8 BA bolts, drill hole 'B' 1/8" or whatever, to suit crankpins. These two plates are now complete.
Plates 2 and 3 are now dealt with. The already drilled 8 BA clearance holes are opened out to 4 BA clearance, and the hole in the centre opened out to 1/4" diameter, the 1/4" slot leading to it being also cut.
Moving on to fig.4, two of these keeper plates are required, and the slot is again t" wide with a 4" diameter bottom. Drill the two fixing holes 10 BA tapping size and then clamp to plate 2 so that the t" centre hole Is formed, and mark the two holes on the plate. These can then be drilled 10 BA tapping size, and the holes in the keeper plate opened out to 10 BA clearance and countersunk. Repeat with other keeper plate and plate 4.
All work is now done and the jig can be used as follows. Assemble the wheels onto the axles, and plates 2 and 3 onto the four spacers. Tighten up with 4 BA nuts. Drop the axle (with wheels on) into the slot and fix the keeper plate into position and ensure that, if necessary, the axle boxes and all washers are fitted. Araldite one crankpin on one end of the axle, and allow to set (I use the 5 minute epoxy, which saves a lot of hanging about). When set, slide one of the outer plates (1 or 4) over the 8 BA studs, and if all was done correctly, the crankpin should pass nicely through hole 'B'. When satisfied that the Araldite has really set, repeat at the other end of the axle, only this time, advance (or retard) the outer plate 90°. When all is set, you will have a completed axle with the crankpins at 90° to each other. Repeat with other axle(s), and when the loco is assembled there should be no binding with the coupling rods.
As for 'Linda', now the cranks have been refitted, I shall have to remake the coupling rods with the right size holes before building can continue, but that is another story.
Note:- The hole sizes are to suit my model, and they can be altered to suit individuals. The size of the jig described can cope with wheels up to about 45mm diameter, which should just about cover all narrow gauge prototypes. One further benefit of this jig is that if another loco is built with a different crank throw, just bolt together plates 1 and 4 and measure along another diagonal the length required and drill. By this method, four different crank throws can be obtained from one jig.